Capture Alive in Bounty Trail
Talk the percent up, then convince them to surrender.
Steam’s store page is not coy. Each bounty is wanted dead or alive. You get paid either way. Bringing the target in alive earns more experience, and you need that experience because later hunts get harder while the $10,000 clock keeps ticking. This page is the alive path. If you already clicked DRAW, read combat next.
The Information meter is the arrest
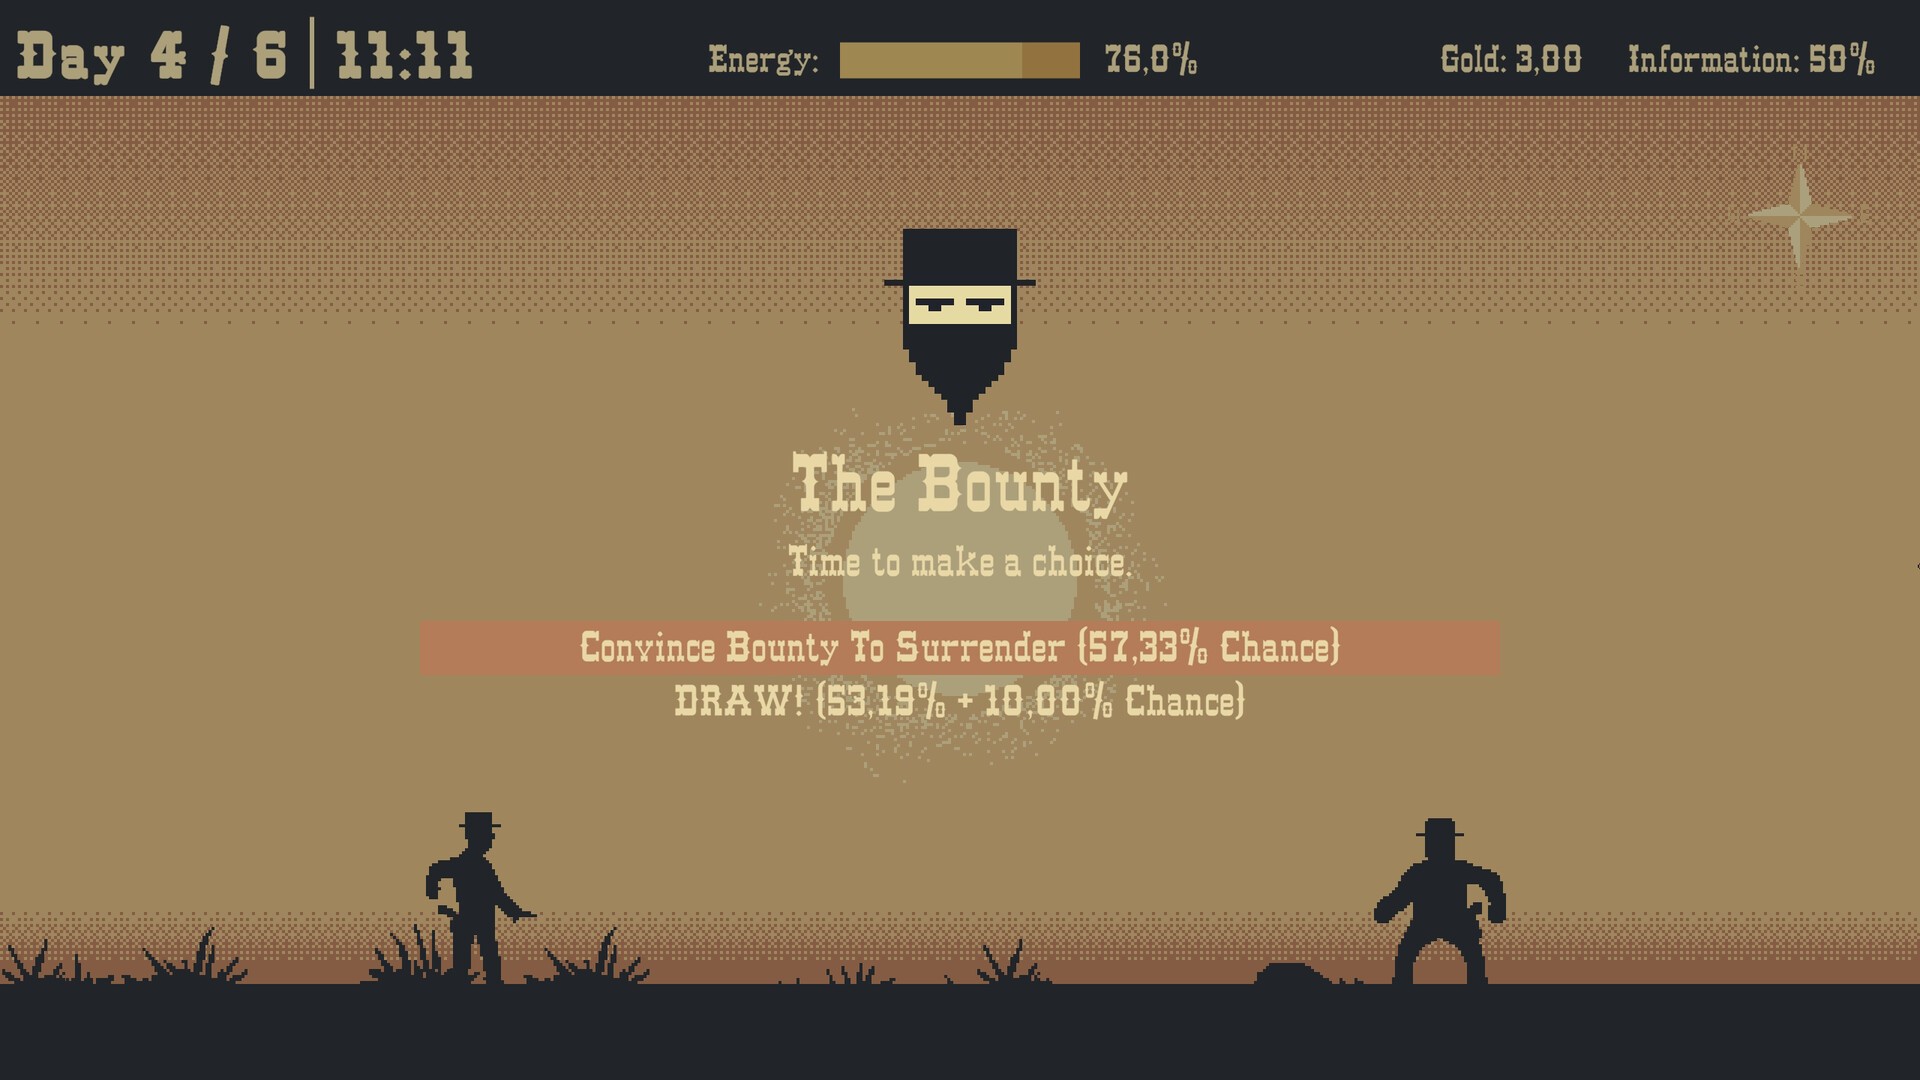
On the trail HUD, Information is a percent. Official screenshots show 53%, 50%, and 35% in different hunts. That number is not flavor. When you reach the bounty, the game opens a choice screen titled The Bounty / Time to make a choice. The top option is Convince Bounty To Surrender with a printed chance. One store shot shows 57,33% at Information 50%. That is the whole minigame: explore until the percent is a plan, not a coin flip.
Low Information (the 35% shot is a hunter already on Day 3 / 3 kneeling with a rifle) means you are in kill territory. High Information means you can press surrender without treating the DRAW bonus as a safety net.
How Information actually rises
The store copy tells you to explore the territory, talk to farmers, look for supplies, and get the lay of the land. That is the intel loop. In practice:
- Ride visible roads first so fog peels off. The map is a dusty top-down plot with hidden farms in the brown.
- Stop at people. Farmers are named in the Steam paragraph for a reason. They are the cheap Information source.
- Follow sighting text. “El Gato Terrible has been seen to the South West” is a compass quest. Ride south-west. Do not tour north for vibes.
- Spend days on purpose. A 7-day clock exists so you can talk. A 3-day clock exists so you cannot. If Day X / Y is already ugly, you will not farm 20% Information in an afternoon.
Supplies are not just loot. Hungry, exhausted hunters camp badly, and camp is how you buy another talking day. Pair this page with how to play so Energy does not dummy you out of the surrender button.
Reading the choice screen
The encounter screen shows the bounty portrait (one shot is a masked face) and two stacked options:
- Convince Bounty To Surrender (A% Chance)
- DRAW! (B% + C% Chance)
In the public screenshot, surrender is 57,33% and DRAW is 53,19% + 10,00%. Two lessons:
- Surrender is not always the higher number. Skills and the DRAW bonus can make a duel look safer than a talk.
- The extra percent on DRAW is why the skills tier exists. Alive XP now is duel bonus later.
If surrender is in the high 50s and you still have Energy, take the talk. A failed surrender is not free, but a habit of DRAW-on-sight starves your level. The office ledger on October 8 in the store shot shows Caught 6 and Killed 1 after 9 hunts. That ratio is the intended career, not an accident.
When you should refuse the alive attempt
Alive is better XP. Alive is not always better this Tuesday.
Skip the speech if:
- Information is still in the 30s and the day counter is done
- Energy cannot survive a failed talk plus a fight
- The poster payout is small and you only need cash for a debt installment (see debt tracker)
- You are on a 3-day clock and already spent two days lost in fog
Killing is still a valid wanted-dead-or-alive result. It just teaches the next Baldheaded Doom that you never leveled.
Territory knowledge is Information by another name
Sandy Plains is a confirmed last-seen location. Learn its roads once and every later Sandy Plains poster gets cheaper. The full game has five territories and 30 bounties. Repeating a territory is how you stop paying a full week of calendar for 10% Information. The walkthrough is the first-month version of that lesson. The tier list flags short-clock hunts as dangerous precisely because they starve this loop.
After a successful surrender
Ride home. Watch Caught tick. Spend the extra XP immediately if a skill would raise the next DRAW bonus or the next talk. Do not sit on points because the office looks pretty. Later bounties are designed to outpace a hunter who only cashes corpses.
If the surrender fails, you are probably in a fight anyway. That is combat. Do not alt-tab to the money guide in the middle of a DRAW; money is for the office.
A simple alive checklist
- Poster day limit of 5+ if the territory is new.
- Talk every farmer you can reach without emptying Energy.
- Chase sighting text, not random fog.
- Camp while Energy still exists.
- Open the choice screen only after Information looks like a plan.
- Compare surrender % to DRAW % + bonus with a cold eye.
- Take the talk when it is close. Take the gun when the calendar is dead.
Sibling pages: How to Play for the HUD, Combat for DRAW, Getting Started for the board. Official store wording and the screenshots are the source for every percent on this page. We will not invent a hidden “lasso minigame” that the UI does not show.
Frequently Asked Questions
Quick answers about bounty hunting, debt, and skills.
How do I capture a bounty alive in Bounty Trail?
Raise Information by exploring and talking, then choose Convince Bounty To Surrender on the choice screen. Higher Information prints a higher percent.
What Information percent is enough?
There is no official cutoff. A store screenshot shows a 57.33% surrender at 50% Information. Treat the 30s as duel range unless you like coin flips.
Does killing still pay?
Yes. Dead or alive both pay. Alive pays more XP for skills, which you need as bounties get tougher.
Why did my surrender chance look worse than DRAW?
DRAW can show a base percent plus a bonus (the public shot adds +10%). Skills and build matter. See skills.
Who is El Gato Terrible?
A bounty with a south-west sighting on an official trail screenshot. Follow the compass text; do not invent extra lore.